Oracle Autonomous Blockchain Cloud Service includes chaincode samples that help you learn how to use the console to implement and manage your network’s chaincodes. The OABCS’s Sample Chaincode page contains two samples:
- Example02 sample is a simple chaincode sample representing two parties with account balances and operations to query the balances and transfer funds between parties.
- Marbles sample is more complex and includes a chaincode to create marbles where each marble has a color and size attribute. You can assign a marble to an owner and enable operations to query status and trade marbles by name or color between owners.

OBCS Console — Samples page
Getting Started with OABCS Samples
You can install, instantiate, and invoke the sample chaincodes included in Oracle Autonomous Blockchain Cloud Service. Use the following steps to get up and running with sample chaincodes.
1. Go to the Blockchain Cloud Service consolehttp://<yourOABCSHostAddress>:<yourOABCSPort>/
Note: Both <yourOABCSHostAddress> and <yourOABCSPort> should have been created during provisioning of your OABCS instance. Please checkGetting to know Oracle Autonomous Blockchain Cloud Service — Part 1 — Working with Provisioning Interface for more details.

OBCS Console — Home page
2. Click the Samples button as highlighted in red above. The Blockchain Samples page is displayed as it follows:
OBCS Console — Samples page
Note: You can also find the samples page by accessing the following URL http://<yourOBCSHostAddress>:<yourOABCSPort>/?root=samples
3. Let’s get started with the first sample(Example02). Thus, click on the corresponding install button for that example so that you can pick the peers you want to install the sample Chaincode on. The following dialog is displayed:
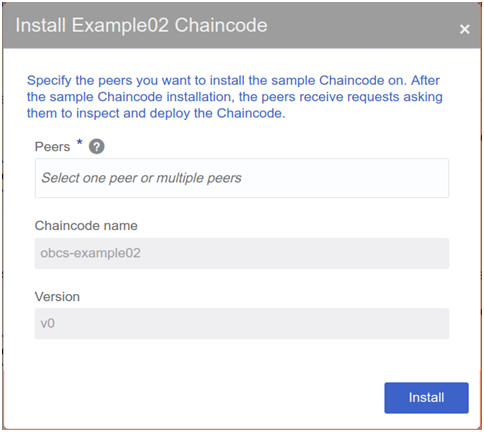
Installing Example02 Chaincode
4. In the Install Chaincode dialog, specify one or more peers to install the chaincode on. Keep chaincode name and version as it is and then click on the Install button.
5. Now, you have to instantiate your chain code against a Channel. Thus, click the chaincode’s Instantiate button.

Instantiate Example02
The following page is shown:

Instantiate Sample Chaincode
6. Select your channel name(boaventuraorderer in my example, or any other name depending the name you have provided to your blockchain network while doing Lesson #2) and click on the Instantiate button. Keep the initial parameters of chaincode as it is.
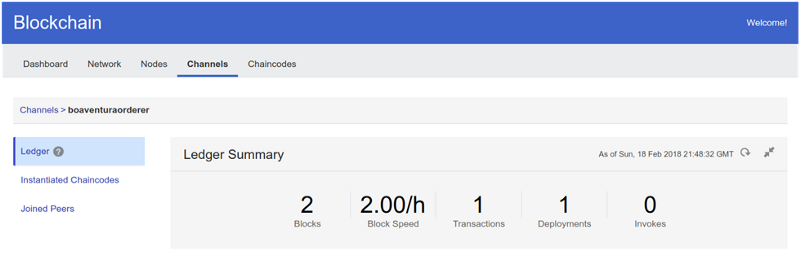
7. In order to confirm that sample chain code was properly instantiated, go to the Channels tab and click the name of the channel that you bound the sample chaincode to(boaventuraorderer in this lab). See picture below for more details:

Verifying that Example02 was instantiated on Channels tab
8. Also, you can find that the Example02 was successfully instantiated on the channel by reviewing the samples page. Therefore, go to the samples page at http://<yourOABCSHostAddress>:<yourOABCSPort>/?root=samples to review the following information as per picture below to make sure that example was properly instantiated on channel:

Verifying that Example02 was instantiated on samples page
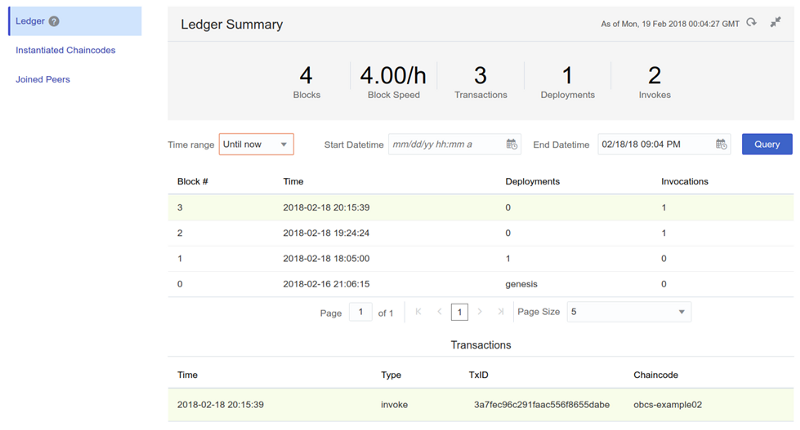
9. Additionally, you can use the Ledger area to locate information about individual transactions on the channel. The Ledger Summary indicates one deployment occurred as highlighted in red below.
Verifying deployment on Ledger Summary
10. In the Query Ledger table, locate the block indicating that the instantiate transaction occurred. Click the block and confirm that in the Transactions table you see “instantiate” in the Type column.

Verifying Deployment Transaction on Ledger Table
or simply go to the Chaincodes tab and find the chaincode ID obcs-example02(v0) installed on the peers and instantiated on channel boaventuraorderer according to the picture below:

Verifying instantiation on Chaincodes Tab
Note: If you are working on a network that contains multiple organizations and have instantiated the chaincode on the founder organization, then you don’t have to instantiate the chaincode on the member organizations where you installed the same chaincode. In such cases, the chaincode is already instantiated and running on the member organizations. For the sake of ease, until now we have only provisioned a founder organization with no members. A more advanced scenario will be further explored later on, then you will be able see different topologies and explore how to setup a blockchain network with multiple organizations.
11. After all previous steps, you should be ready to invoke your sample(Example02) if everything went well so far. As such, click on the invoke button as per picture below:

Invoking Example02 sample
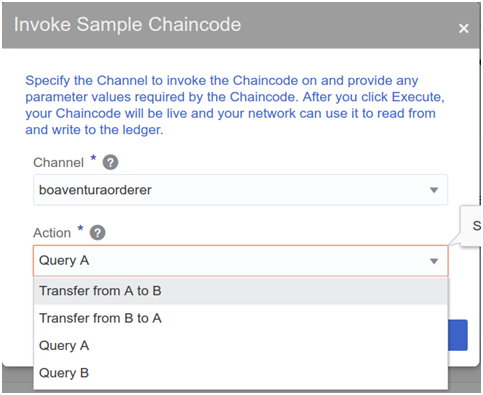
12. The following dialog is displayed:

Invoke Sample Chaincode
13. In the Invoke Chaincode dialog, select a channel to run the transaction on(boaventuraorderer).
14. In the Action field, specify an action to execute the chaincode(Query A).
15. Click Execute. The Interaction Results shows returned values, and the API details field displays the detailed log of all blockchain processes performed from invoking the transaction.

Transaction Results — Detailed API logs
In order to confirm that the chaincode was successfully invoked, perform the following steps:
16. Go to the Channels tab.
17. Locate and click the channel(boaventuraorderer) the chaincode was installed on.
18. Then, confirm that the Ledger pane is selected, and in the Query Ledger table, locate the block number indicating that an invocation occurred. Click the block and confirm that in the Transactions table you see “invoke” in the Type column. See picture below for details:
Ledger Transactions
19. Alternatively, you can go to the Samples page and invoke any other operations on the chaincode such as “Query B“, “Transfer from A to B“, “Transfer from B to C“, and then monitoring the results in Channels Tab under the Ledger pane.
Invoking other Example02 actions
20. Now repeating the same steps as described earlier, install the Marble Sample.

Stuff to Know
Chaincode is the code that runs a Blockchain network, defining what types of data are written during transactions, providing logic around how transactions are executed and validating the conditions under which they should be run. Chaincode initializes and manages ledger state through transactions submitted by applications. A chaincode typically handles business logic agreed to by members of the network, so it is also sometimes referred to as a “smart contract”. Therefore, you can see chaincodes as the term for programs that run on top of the blockchain to implement the business logic of how applications interact with the ledger. When a transaction is proposed, it triggers chaincode that decides what state change should be applied to the ledger.
Additionally, chaincode can be defined as software defining an asset or assets within the Hyperledger fabric, and the transaction instructions for modifying the asset(s). These assets can range from the tangible (real estate and hardware) to the intangible (contracts and intellectual property). Hyperledger Fabric provides the ability to modify assets using chaincode transactions. Assets are represented in Hyperledger Fabric as a collection of key-value pairs, with state changes recorded as transactions on a Channel ledger. Assets can be represented in binary and/or JSON format.
Furthermore, it is responsible for establishing the types of objects stored on the Blockchain ledger, and how they are created, modified, deleted, etc. It is, so to speak, responsible for maintaining the ledger’s ‘state of the world’. A ledger takes the form of a versioned key/value map, where keys are strings and values are binary blobs. The ledger also maintains a complete history of the values associated with a particular key, such that all modifications are recorded and are retrievable by chaincode if required for the usecase. The values stored in the ledger are only able to be manipulated by get and put operations, and so all chaincode logic must ultimately result in, or derive from, some series of writes and reads on the ledger state.
How chaincode looks alike
Each chaincode implements an Init method and an Invoke method. The first is used for setup, and the second is used to do the main work of the chaincode. Both methods accept a ChaincodeStubInterface parameter, which carries a client for interacting with the ledger and for querying other chaincodes.
The ChaincodeStubInterface also holds a list of arguments passed to the chaincode, which allows the chaincode to implement different behaviors for different scenarios. For example, a single chaincode may implement multiple functions. Also, stub provides functions to access history, state, etc via calls to peer.

Below you can find a list of Chaincode Stub Interface Functions(the most common are in bold)
- GetArgs() [][]byte
- GetStringArgs() []string
- GetFunctionAndParameters() (string, []string)
- GetArgsSlice() ([]byte, error)
- GetTxID() string
- InvokeChaincode(chaincodeName string, args [][]byte, channel string) pb.Response
- GetState(key string) ([]byte, error)
- PutState(key string, value []byte) error
- DelState(key string) error
- GetStateByRange(startKey, endKey string) (StateQueryIteratorInterface, error)
- GetStateByPartialCompositeKey(objectType string, keys []string) (StateQueryIteratorInterface, error)
- CreateCompositeKey(objectType string, attributes []string) (string, error)
- SplitCompositeKey(compositeKey string) (string, []string, error)
- GetQueryResult(query string) (StateQueryIteratorInterface, error)
- GetHistoryForKey(key string) (HistoryQueryIteratorInterface, error)
- GetCreator() ([]byte, error)
- GetTransient() (map[string][]byte, error)
- GetBinding() ([]byte, error)
- GetSignedProposal() (*pb.SignedProposal, error)
- GetTxTimestamp() (*timestamp.Timestamp, error)
- SetEvent(name string, payload []byte) error
Special type of Chaincode (System Chaincode)
There’s a special kind of chaincode that follows a different lifecycle. System chaincode runs as part of the Peer process, not in a separate container. It’s used to implement low-level ledger features like the endorser system, query system, and validation system. Because these features are so fundamental, the system chaincodes that implement them are deployed when the Peer starts (instead of being dynamically added later like other chaincodes).
Reviewing both Example02 and Marbles chaincodes
Now, let’s review the chaincode source code from the examples we just installed and instantiated to understand how things were done. Therefore, at first, you need to know where to get the source code for these examples. They can be found at the samples page at http://<yourOABCSHostAddress>:<yourOABCSPort>/?root=samples. Lets get started and use Marbles.go as the reference to understand Chaincode Structure. So, hit the link Marbles.goas shown below:

Marbles.go Link
Alternatively, you can access the Marbles.go by accessing the following link http://<yourOABCSHostAddress>:<yourOABCSPort>/chaincodes/marbles_chaincode.txt. Thus, you should see the following source code:

Marbles.go source code
It is probably easiest to break down this file from top to bottom, explaining each of the important elements in turn. Thus, let’s start first with the import piece of code.
import (
…
“github.com/hyperledger/fabric/core/chaincode/shim”
“github.com/hyperledger/fabric/protos/peer”
)
These are the packages required to implement chaincode, with the shim package being the core mechanism by which you interact with the ledger, as well as providing helper methods for generating chaincode responses. You never really touch the peer package directly, instead relying upon the aforementioned helper methods.
Now, following the imports section, there is an empty struct definition, called ‘SimpleChaincode’ and another one with member fields called ‘marble’:
type SimpleChaincode struct {
}
type marble struct {
ObjectType string `json:”docType”`
Name string `json:”name”`
Color string `json:”color”`
Size int `json:”size”`
Owner string `json:”owner”`
}
Go is a somewhat object-oriented language, and this struct is the ‘object’ which implements the
chaincode functions. Chaincode must, as mentioned earlier, in order to be able to run, implement two specific interface functions, Init() and Invoke(). Both functions take a shim.ChaincodeStubInterface as a single argument and return a peer.Response. Implementing this prescribed interface is what defines your code as ‘Chaincode’.
Additionally, this chaincode has a main method before the definition of Init, that calls shim.Start() with an instance of the SimpleChaincode object. This is used for starting the chaincode in the chaincode runtime.
// ========================================
// Main
// ========================================
func main() {
err := shim.Start(new(SimpleChaincode))
if err != nil {
fmt.Printf(“Error starting Simple chaincode: %s”, err)
}
}
Now we get to the implementations of the chaincode specific functions. Note that these functions are associated with the SimpleChaincode object defined earlier via the ‘(t * SimpleChaincode)’ in the definition (think of the ‘t’ as ‘this’ if coming from a more conventional class-based language).
// Init initializes chaincode
// ===========================
func (t *SimpleChaincode) Init(stub shim.ChaincodeStubInterface) pb.Response {
return shim.Success(nil)
}
Init is used to initialize the chaincode, and do any initial ledger setup. However, it is also called whenever the chaincode is upgraded, to allow for tweaks to existing data to accommodate new data structures or similar. If there is no migration, the Init method should be empty, as it is here, since we don’t want to accidentally overwrite the data in the ledger.
// Invoke — Our entry point for Invocations
// ========================================
func (t *SimpleChaincode) Invoke(stub shim.ChaincodeStubInterface) pb.Response {
function, args := stub.GetFunctionAndParameters()
fmt.Println(“invoke is running “ + function)
// Handle different functions
if function == “initMarble” { //create a new marble
return t.initMarble(stub, args)
} else if function == “transferMarble” { //change owner of a specific marble
return t.transferMarble(stub, args)
} else if function == “transferMarblesBasedOnColor” { //transfer all marbles of a certain color
return t.transferMarblesBasedOnColor(stub, args)
} else if function == “delete” { //delete a marble
return t.delete(stub, args)
} else if function == “readMarble” { //read a marble
return t.readMarble(stub, args)
} else if function == “queryMarblesByOwner” { //find marbles for owner X using rich query
return t.queryMarblesByOwner(stub, args)
} else if function == “queryMarbles” { //find marbles based on an ad hoc rich query
return t.queryMarbles(stub, args)
} else if function == “getHistoryForMarble” { //get history of values for a marble
return t.getHistoryForMarble(stub, args)
} else if function == “getMarblesByRange” { //get marbles based on range query
return t.getMarblesByRange(stub, args)
}
fmt.Println(“invoke did not find func: “ + function) //error
return shim.Error(“Received unknown function invocation”)
}
Invoke is the entry point into our chaincode, and is called on each transaction. The shim handles the bundling up of arguments to be invoked, and provides a helper method (GetFunctionAndParameters) to extract them. Typically, following the extraction of the function, this would be used as the input to a switch statement to pass control to the appropriate function, i.e. from marble (which uses functionally equivalent chained ‘if else’ statements instead of a switch):
// Handle different functions
if function == “initMarble” { //create a new marble
return t.initMarble(stub, args)
}
Note: GetFunctionAndParameters() only works for string arguments. If you are working with other object types, you can use GetArgs() and handle the arguments as byte arrays.
Now, if you have a look at the way you used to invoke marbles chaincode earlier in this lab lession, as shown in the picture below

Marbles Chaincode actions available
you certainly will notice that there is a go function to implement it. You can find a list of them available within the Invoke function. Also, find below their respective declarations for your reference. Thus, if you need to change your chaincode business logic, then change the functions below that are implementing the rules to change data in your ledger.
- func (t *SimpleChaincode) initMarble(stub shim.ChaincodeStubInterface, args []string) pb.Response
- func (t *SimpleChaincode) readMarble(stub shim.ChaincodeStubInterface, args []string) pb.Response
- func (t *SimpleChaincode) delete(stub shim.ChaincodeStubInterface, args []string) pb.Response
- func (t *SimpleChaincode) transferMarble(stub shim.ChaincodeStubInterface, args []string) pb.Response
- func (t *SimpleChaincode) getMarblesByRange(stub shim.ChaincodeStubInterface, args []string) pb.Response
- func (t *SimpleChaincode) transferMarblesBasedOnColor(stub shim.ChaincodeStubInterface, args []string) pb.Response
- func (t *SimpleChaincode) queryMarblesByOwner(stub shim.ChaincodeStubInterface, args []string) pb.Response
- func (t *SimpleChaincode) queryMarbles(stub shim.ChaincodeStubInterface, args []string) pb.Response
- func getQueryResultForQueryString(stub shim.ChaincodeStubInterface, queryString string) ([]byte, error)
- func (t *SimpleChaincode) getHistoryForMarble(stub shim.ChaincodeStubInterface, args []string) pb.Response
Now, that you just finished this introduction to chaincode and their functionalities, and certainly are more familiar and confident for working with chaincodes, a key component of Hyperledger fabric, you can move to the next article, EXPOSE AND RUN DEPLOYED SAMPLE SMART CONTRACTS VIA REST PROXY.
Please like on this article if it has helped you to understand a bit about blockchain, Hyperledger Fabric & Oracle Autonomous Blockchain Cloud Service. And please leave a comment and state your feedback. This is very important to help me keep writing new articles about this sort of content.

Pingback: Getting to know Oracle Autonomous Blockchain Cloud Service — Part 3— Expose and run deployed sample smart contracts via REST proxy | My Experiences from the Field